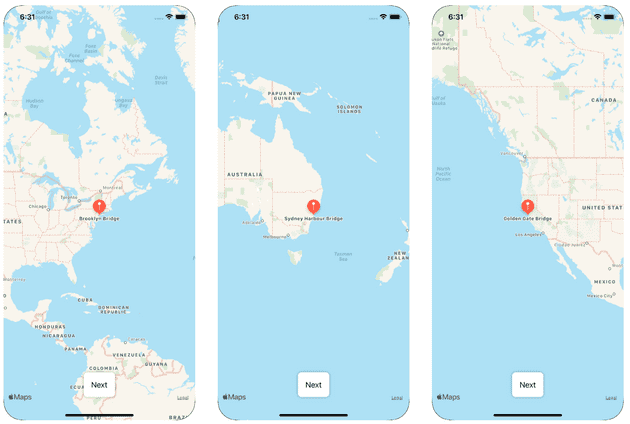
The goals of this article is to show how to:
- Use
MKMapViewby conforming to UIRepresentableView in SwiftUI - Show an array of annotations using
@Stateand@Binding - Handle
MKMapViewDelegatewith providing a Coordinator - Programmatically interact with
MKMapViewto select an annotation
To illustrate this, we will build a bridge app that list 3 bridges on a map view and allow the user to move the map to the “next” bridge.
You can also download the example app project here
Use MKMapView with UIRepresentableView in SwiftUI
To learn about interfacing with UIKit, Apple has released a tutorial to help us understanding how to do so with UIPageViewController and UIPageControl. Interfacing with MKMapView isn’t actually much different in its structure.
The only requirement is to conform to UIRepresentableView to make a UIKit view available.
To interface with MapKit and UIKit we will create a MapView which is a missing component that we don’t have (yet) with SwiftUI. It came with iOS 14 release.
struct MapView: UIViewRepresentable {
    func makeUIView(context: Context) -> MKMapView {
        MKMapView()
    }

    func updateUIView(_ uiView: MKMapView, context: Context) {
    }
With this we already have a component ready to be used from our SwiftUI code and this will display our familiar MKMapView.
struct RootView: View {
    var body: some View {
        MapView().edgesIgnoringSafeArea(.vertical)
    }
}
Show an array of annotations
For our example app we will display some bridges of the world, so we need first to create a model Landmark to represent them.
struct Landmark {
    let id: String
    let name: String
    let location: CLLocationCoordinate2D
}
From RootView we can add a @State property that will be data driving what is displayed in the map.
struct RootView: View {
    @State var landmarks: [Landmark] = [
        Landmark(name: "Sydney Harbour Bridge", location: .init(latitude: -33.852222, longitude: 151.210556)),
        Landmark(name: “Brooklyn Bridge”, location: .init(latitude: 40.706, longitude: -73.997))
    ]

    var body: some View {
        MapView(landmarks: $landmarks)
            .edgesIgnoringSafeArea(.vertical)
    }
}

struct MapView: UIViewRepresentable {
    @Binding var landmarks: [Landmark]
}
Not specific to SwiftUI, to display the array of landmarks we create a new model which is a subclass of MKAnnotation. This could be more generic with a protocol MapAnnotatable where the subclass of MKAnnotation can be initialised with anything that conforms to our protocol.
But to keep it simple this is just what is enough:
final class LandmarkAnnotation: NSObject, MKAnnotation {
    let id: String
    let title: String?
    let coordinate: CLLocationCoordinate2D

    init(landmark: Landmark) {
        self.id = landmark.id
        self.title = landmark.name
        self.coordinate = landmark.location
    }
}
We can then update our MapView to create annotations based on our Binding property.
func updateUIView(_ uiView: MKMapView, context: Context) {
    updateAnnotations(from: uiView)
}

private func updateAnnotations(from mapView: MKMapView) {
    mapView.removeAnnotations(mapView.annotations)
  let newAnnotations = landmarks.map { LandmarkAnnotation(landmark: $0) }
  mapView.addAnnotations(newAnnotations)
}
From this point, we have everything to display any type of data that is fetched/computed from the RootView.
Handle MKMapViewDelegate
What if we want to add some user interaction in this map? We need to provide a Coordinator to interface with UIKit and MapKit delegate methods. This Coordinator is responsible of:
- Implement delegates and data sources
- Respond to user events
func makeCoordinator() -> Coordinator {
    Coordinator(self)
}

final class Coordinator: NSObject, MKMapViewDelegate {
    var control: MapView

    init(_ control: MapView) {
        self.control = control
    }
}

func makeUIView(context: Context) -> MKMapView {
    let map = MKMapView()
    map.delegate = context.coordinator
    return map
}
So if we want to respond to user selecting an annotation to centre the map at that particular region, what we can add from the Coordinator is the MapKit delegate.
func mapView(_ mapView: MKMapView, didSelect view: MKAnnotationView) {
    guard let coordinates = view.annotation?.coordinate else { return }
    let span = mapView.region.span
    let region = MKCoordinateRegion(center: coordinates, span: span)
    mapView.setRegion(region, animated: true)
}
Programmatically interact with MKMapView to select an annotation
What we would like to do here is from the RootView handle some user interaction (button tapped) to go to the next annotation for example. But if you’re new with SwiftUI but not new with UIKit you might start to wonder how.
The key to do so is to use Binding again from our MapView component. So from the RootView, where we handle button tap action, we can update some local @State that is used as a binding to communicate.
The RootView will be responsible to maintain the state of the selected landmark, but from our map view our concern is to re-act to this variable by adding the @Binding var selectedLandmark. Then we can update the updateAnnotation() method to have a specific behaviour for the selected annotation. Since we have access to the MKMapView we can programmatically call mapView.selectAnnotation().
// From MapView.swift

@Binding var selectedLandmark: Landmark?

private func updateAnnotations(from mapView: MKMapView) {
    mapView.removeAnnotations(mapView.annotations)
    let newAnnotations = landmarks.map { LandmarkAnnotation(landmark: $0) }
    mapView.addAnnotations(newAnnotations)
    if let selectedAnnotation = newAnnotations.first(where: { $0.id == selectedLandmark?.id }) {
        mapView.selectAnnotation(selectedAnnotation, animated: true)
    }
}
To complete the cycle, from the RootView, we need to add the @State var selectedLandmark which will be passed as a binding to the MapView.
To update that given selected landmark, we added a ZStack to add on top of the MapView a button to mutate the selected landmark.
@State var selectedLandmark: Landmark? = nil

var body: some View {
    ZStack {
        MapView(landmarks: $landmarks,
                selectedLandmark: $selectedLandmark)
            .edgesIgnoringSafeArea(.vertical)
        VStack {
            Spacer()
            Button(“Next”) {
                self.selectNextLandmark()
            }
        }
    }
}

private func selectNextLandmark() {
    if let selectedLandmark = selectedLandmark, let currentIndex = landmarks.firstIndex(where: { $0 == selectedLandmark }), currentIndex + 1 < landmarks.endIndex {
        self.selectedLandmark = landmarks[currentIndex + 1]
    } else {
        selectedLandmark = landmarks.first
    }
}